本文共 2078 字,大约阅读时间需要 6 分钟。
文章目录
前言
上一篇文章()里,笔者对SCM的Pipeline的状态转化做了一定的分析。本文笔者将对SCM中另外一个重要概念Container做详细的分析。Container作为Ozone SCM提供服务的存储单元,SCM内部在Container级别进行数据的Replication,心跳汇报操作等等。这点类似于HDFS内的NameNode对于Block的处理。本文笔者主要介绍Container的状态转化,至于Container内部的数据组织形式,笔者在前面介绍SCM Datanode的文章中已经介绍过,这里就不展开篇幅阐述了。
SCM和Datanode之间的Container处理过程
因为Ozone SCM提供存储数据的单位是Container,因此中心服务SCM和其下管理的Datanode节点是基于Container Report进行心跳汇报的。
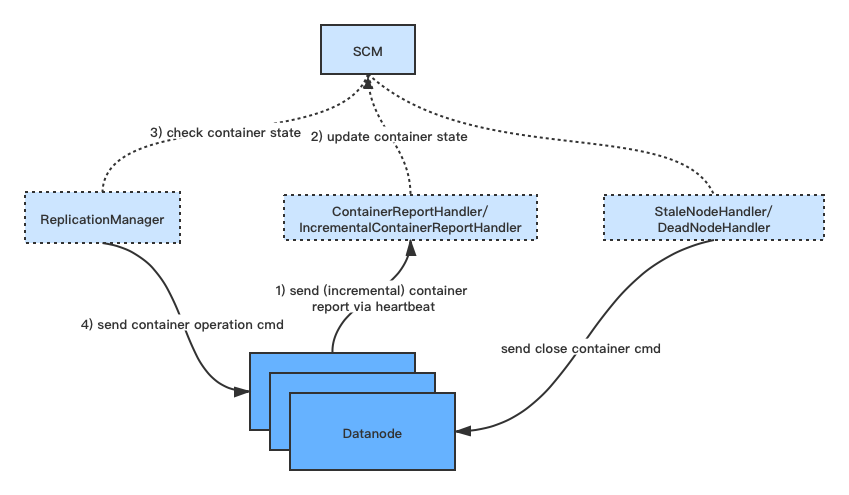
这其中涉及的处理过程如下所示:
1)Datanode获取本地最新Container状态报告,心跳方式发送给SCM服务。
2)SCM服务接受到Datanode的Container报告后,对比自身内存维护的Container信息,进行相关Container状态的更新,同时处理副本数不足以及miss掉的Container副本。 3)SCM内部ReplicationManager服务同时会定期检查Container副本状态信息,进行Container副本的处理,例如副本多余,不足的情况以及Container状态不一致的情况,需要触发close Container命令的操作。 4)SCM的Stale/DeadHandler处理dead节点,inactive Pipeline时,也会触发针对dead节点内的Container close命令,inactive Pipeline内包含的Container close操作。上述过程的图示过程如下所示:

SCM Container的状态转化
在上述SCM和Datanode之间的Container处理过程中,会涉及到Container状态的多次切换。
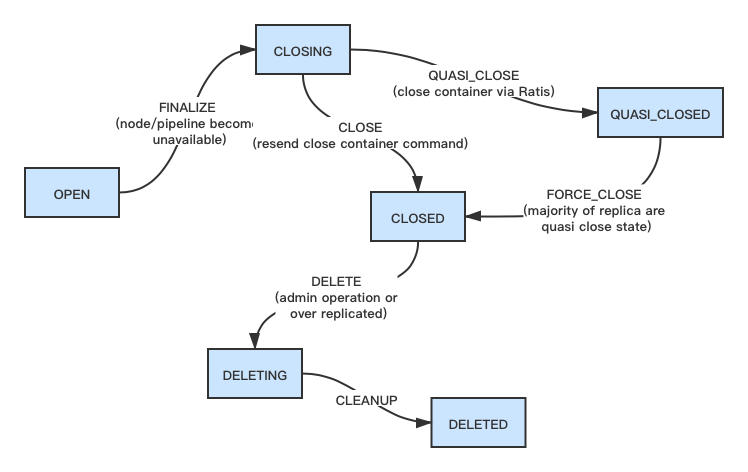
不过在这里,Container拥有比Pipeline更复杂的状态切换过程,它总共包含有以下6种状态,不同转态间转化有相应的event事件定义。
- OPEN,Container初始被创建初始的状态,Container只有处于OPEN状态才能进行其内部的写数据操作。
- CLOSING,Container处于正在被关闭中的状态。
- QUASI_CLOSED,Container处于待关闭状态。
- CLOSED,Container处于已关闭状态,只有处于CLOSED状态的Container才能被允许执行replication操作。外部操作能够读取CLOSED状态的Container内部数据。
- DELETING,Container正在删除状态。
- DELETED,Container已删除状态,Container删除操作目前主要发生于admin用户的删除Container操作行为和多余副本的删除处理操作。
上面这里重点区分下QUASI_CLOSED和CLOSED的状态。QUASI_CLOSED是Container CLOSED状态的前一个临时转态,表示的意思是Container处于即将关闭的状态。因为在实际Container Close操作过程中,会出现Raft一致性协议通信由于网络或者节点失败导致一致性无法达成的情况,但此时我们又不能让Container一直处于OPEN可用的状态,于是我们需要有一种手段可以让其变为可CLOSED的状态。Container在变为CLOSED状态后,就可以进行replication操作,而且不会进行此Container数据的新写入操作了。
鉴于这种情况,社区对此引入QUASI_CLOSED状态,先将Container状态从CLOSING状态变为QUASI_CLOSED。如果汇报上来超过半数以上副本是QUASI_CLOSED,然后SCM这边可以强制将Container再变为CLOSED。Datanode上Container状态的更新,在下一次的Datanode心跳中,将会及时上报到SCM这边。
Container各个状态间的切换过程图如下所示:

引用
[1].https://issues.apache.org/jira/browse/HDDS-2794 . Failed to close QUASI_CLOSED container
[2].https://issues.apache.org/jira/browse/HDDS-1561 . Mark OPEN containers as QUASI_CLOSED as part of Ratis groupRemove [3].https://issues.apache.org/jira/browse/HDDS-737 . Introduce Incremental Container Report转载地址:http://vkng.baihongyu.com/